Yashica Electro 35: The 'Pad of Death'
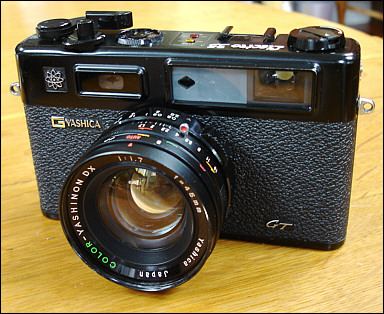
They were a throwback to the days of the big 35mm rangefinders, competing in size and market share with similar cameras from Mamiya, Fujica, Minolta, Konica, Petri and others.
If you own one of the Yashica Electro models, perhaps you've heard of the "Yashica Pad of Death."
When functioning normally, the Electro should make a "thunk" when you advance the film and tension the shutter. It might be the only camera in which a "thunk" is expected, because most things that "thunk" have some type of problem - whether it's your car, refrigerator or camera.
That's what you tell the repair guy. "It goes 'thunk.' "
If your Electro doesn't "thunk," then it needs to have its "Pad of Death" replaced.
Most sites recommend removing the front body covering and then removing the lens from the camera. It's a messy affair and takes much patience to put the lens back onto the body and then make sure that everything is functioning correctly.
Here is a way to replace the pad without removing the lens.
But first, why is the "Pad of Death" necessary?
The shutter release isn't a single post that releases the shutter. There are two posts involved, and the second post must move to a certain point where a pawl catches and holds it.
When the photographer advances the film, the pawl moves out of the way and the secondary post snaps back into place, striking the "Pad of Death," emitting a "thunk" in the process.
When the piece of foam in this mechanism degrades, the secondary post cannot be pushed far enough and simply returns to its original spot. From what I've read, the secondary post plays a role in the camera's electronics, and it is important that this post be caught and held when the shutter button is pressed.
The video below illustrates how the secondary post is caught and held by the pawl. When the photographer advances the film, the pawl releases the post. At the end of the video, watch as I simulate what happens when the "Pad of Death" degrades. Note how the shutter still trips, but the post cannot be pushed fully to a locking position. (Don't forget to use the full-screen option.)
Replacing the 'Pad of Death'
What you will need:
- Small Phillips-head screwdriver
- A spanner wrench (or a school compass with two sharp points).
- Tweezers - the longer, the better
- Rubber pad with self-adhesive
- Wax tools (or a very stiff paper clip)
- Ruler
- Scissors
- Cutting board
- Hobby knife (optional)
- Flashlight (optional)
All items unscrew remove normally - counterclockwise.
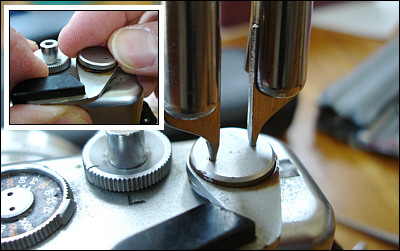
Use a spanner wrench to remove the cap on the film advance. You can loosen it with the spanner wrench and then use your fingers to unscrew it the rest of the way. Remember the order and orientation of the parts.
Use the spanner wrench to remove the film speed dial. The trick when reassembling this is to put the pin in the outer dial, turn the outer dial to either its highest or lowest setting and tighten the one with the printed speeds until it lines up with the small hash mark. Firmly hold the film speed dial in place and fully tighen the screw.
Use the Phillips-head screwdriver to remove the three screws. There is one on each end and a third just to the right of the battery test button.
The top deck will lift straight off. There is a small wire that connects to the flash synchronization post. You can desolder this or you can leave it attached.
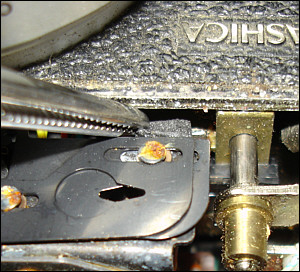
2) Find the "Pad of Death."
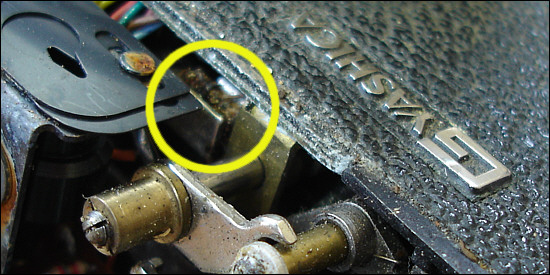
A small flashlight can help you to see the "Pad of Death" and might help when replacing it.
Because of its location, many people recommend removing the lens from the camera. That's a more complicated process. I've found that if you have a steady hand and are patient, you can replace the "Pad of Death" without removing the lens. It's a tight fit, but it's doable.
It's best to move the second post out of the way. You can do this by pushing the small bracket at the top of the post toward the bottom of the camera. You will hear it click when it is locked into place, as it does in the video above.
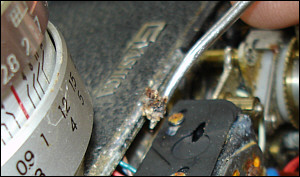
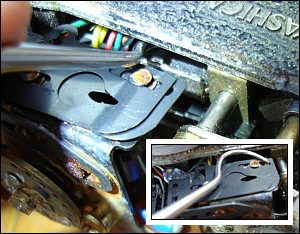
Use your wax tool or a paper clip that is bent at the end and tweezers to completely remove the small piece of foam. Try to remove the adhesive as well. Don't allow any of this to fall into the camera body.
The foam might be a gooey mess, which might make it easier, because it will stick to your tool.
As seen in the photo, you probably will have to remove it in small pieces. If it is especially messy, a small cotton swab with some lighter fluid can help you clean up the mess.
The idea is to remove the old pad and its adhesive. Take your time.
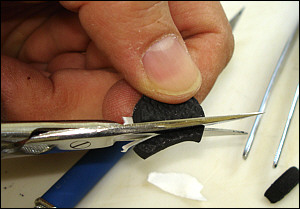
Now, cut the new piece. I like either rubber or a rubber-like material, such as shown in the photo.
First, cut the piece to the approximate shape - roughly 6mm long and 1mm wide. If it's too high, you can use either a hobby knife (be careful!) or scissors to trim it to 2mm in height.
I found it easiest to make my first cuts with a pair of scissors and then use the hobby knife to trim the height. If you don't have a hobby knife, use the scissors to carefully trim it to the correct height. You don't want the piece to be shorter than 2mm and probably not much higher.
Remove the paper backing to expose the adhesive. Use a pair of tweezers to carefully place the new pad in place.
When inserting the new pad, do not allow it to fall into the camera. Only bad things can happen, and then you will have to remove the lens.
When inserting the new pad, the adhesive should attach to the small ledge - the one that held the old pad. The side with the adhesive should be facing upward - toward the top of the camera.
Use your wax tool or paper clip to pull it into place. If the new pad doesn't feel secure, you can always use either your wax tool or another paper clip to apply some glue. Allow time for the glue to set.
As you can see, there isn't much space for you to slip your new pad into place, so take your time and use both of your tools.
The inset in the lower photos shows the type of tool I used to pull the new pad into place. If you use a paper clip, bend a small portion of the tip so it is a bit less than a 90-degree angle.
You can use your tweezers and your wax tool (or your paper clip) to guide it into place using a two-handed approach.
6) Testing the new "Pad of Death." With the new pad in place, press the shutter release. Put the film advance on its post and lightly tighten with your fingers. Advance the crank and watch as the small bracket strikes your new pad. It should make a "thunk." Depress the shutter release and see if it locks into place. You know it will lock, because that tiny bracket that you pushed out of the way should stay down and won't return until you use the film advance.
Repeat several times and check to see that the new pad isn't moving. It should sound similar to the camera in the video above.
If all seems well, reassemble the camera's top deck, including resoldering the wire to the flash synchronization post, if you had removed it.
You're finished. You've just replaced the "Pad of Death."