Reviving the Rangefinder in a Kodak Signet 35
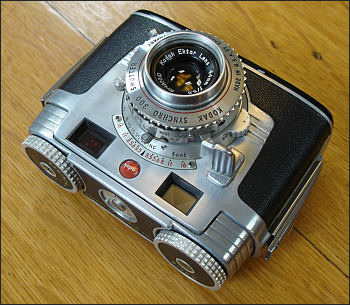
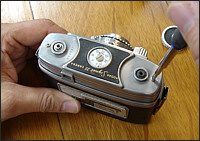
Kodak's Signet 35 is a handsome little 35mm camera.
A couple of years ago, I picked up a second Signet 35. I had so much fun with the first camera that I figured I would double my fun with a second camera.
I finished my work on the shutter and collimating the lens Everything was running smoothly. I lifted it to my eye - and was greeted by a completely clear view. The rangefinder patch was not visible.
Well, I figured, that maybe it will become a scale-focus camera like many of the Voigtlander Vitos and the early Kodak Retinas.
For the next couple of days, I let the camera sit. I recalled some previous posts on some Web forums in which people darkened the secondary window.
I wasn't sure it would work, so I tried the sunglasses test. I held my sunglasses in front of the secondary window. Nothing.
Then a thought hit me. Try the main viewing window. Voila! I could see a double image.
Now, the first challenge was in finding a material that would be dark enough to make it work but not so dark as to make it unusable. I considered some of the glass-tint material sold at auto parts stores. But the material was too dark.
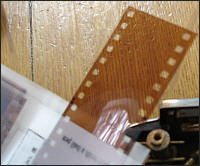
A blank section of processed 35mm color print film.
A pale yellow or pale brown tint would work best. Maybe even a pale violet, which is close to the tint in my other Signet 35.
The saying goes, "Necessity is the mother of invention." I had a good material right in front of me: a blank color print negative. Although it was a bit darker than I would like, it provided the necessary contrast for the viewfinder.
I held it up in front of the main viewing window, and it seemed to work.
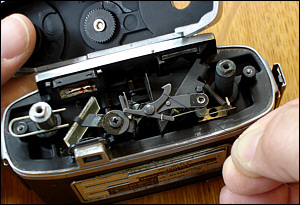
Next, came the task of disassembling the Signet. For the most part, there are no surprises with this camera. Later, I'll give you an important tip on reassembly. First, remove the top deck. Note that there is a coiled spring on the post for the advance knob. Put that aside and don't lose it.
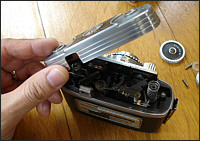
The Signet 35's top deck should lift off easily.
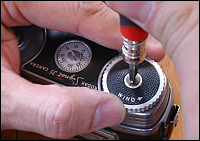
Holding the knob will make it easier to remove and reassemble.
Remove the screws under the advance and rewind knobs.
Once the top deck is off of the camera, you want to locate the front glass of the viewfinder. That's easy to find, because it's the larger glass lens. It is a lens. A flat surface in the front and a concave surface on the other side.
That presented a challenge, because I wanted my tint to be behind the
viewfinder glass. In this case, I didn't have a choice. It would have to
be in front.
Carefully, pry the small metal retaining frame upward. Be careful not to snap off the frames small tabs, which help to hold the viewfinder glass in place. You might need to work it a bit on one side and then the other. After all, it's been in place since the 1950s. After removing it, wash and thoroughly dry the viewfinder glass.
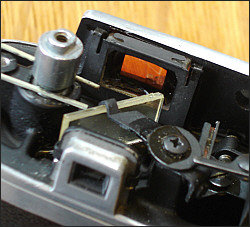
How it looks with the tinting material (color negative) in place.
Next, cut a piece of your tinting material to the exact size of the viewfinder glass. You can use the viewfinder glass as a template and trace around it. You can trim it to shape with either a sharp pair of scissors or a hobby knife. I used scissors
If you really are off when cutting your piece, start over. Film is cheap - that's what people used to say in the film days.
Clean and dry your tinting material. Use a bit of compressed air to blow away any dust particles, because you don't want anything trapped between the viewfinder glass and your tinting material. I found it best to first slide the glass and tinting material into place followed by the retaining frame. Be sure to slip the frame between the small post and the viewfinder glass. It should be a very snug fit. If it's loose, you can use a small drop of clear or black fingernail polish to hold it in place.
Check the viewfinder. You should be able to see a double image clearly.
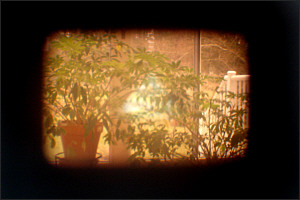
With the tinting material in place, you can see the triangular rangefinder patch.
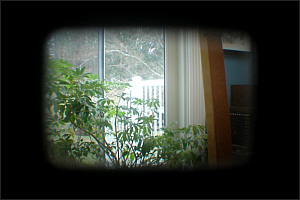
How the viewfinder looked after the camera was serviced. No rangefinder patch is visible.
Before you replace the top deck, you'll want to
check horizontal and vertical alignment. Calibrating the Signet 35's
rangefinder isn't too difficult. The adjustment screw for vertical
alignment is on the bracket behind the semi-gilded mirror. Horizontal
adjustment requires removal of the depth-of-field scale from the front
of the camera. The hole behind the scale provides access to the
adjustment screw.
When making the adjustment, find a distant object. Building, traffic sign, house. DO NOT USE THE SUN – EVER!
You can use a tripod, or you can hold the camera. A tripod will allow you to turn the adjustment screw slowly while peering through the viewfinder. When holding the camera by hand, you might have to move the camera from your eye each time you make a small adjustment.
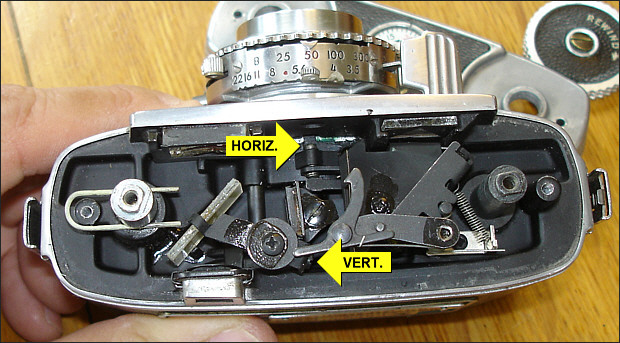
Making rangefinder adjustments differs from one camera to the next. Here are the adjustment screws in a Kodak Signet 35. The top must be off to make vertical adjustments. Before reassembly, remember that the retaining clip for the rewind post must be in the position seen above.
Remember that the lens should be set at infinity.
Use a vertical object or line for making the horizontal adjustment and a
horizontal object or line for making the vertical adjustment.
Once you think you've made the correct adjustments, change the focus of the lens from infinity to close and back to infinity while peering through the viewfinder. Everything should fall into perfect horizontal and vertical alignment as you reach infinity. If it fails to reach alignment or goes past perfect alignment, make the necessary adjustment and check again.
Hook this small arm with a piece of thread and pull back when you replace the top deck.
When the top deck is on the camera, remove the string by pulling on one end.
Hold down the top deck with one hand while turning the film advance post with your fingers. You should hear a ratcheting sound.
Now, it's time to replace the top deck. There is one thing to remember. The frame counter is part of the top deck, and a metal arm increments the frame counter as you advance the film and also prevents the photographer from turning the film advance knob in the wrong direction. The arm is driven by the sprocket wheel in the film chamber.
You must move the arm so that it clears the frame counter gear, which you can see in the top photo to the right is attached to the underside of the top deck.
But how do you do this? It's simple. Use a piece of thread to hook and pull the arm out of the way. Once the top deck is in place, remove the thread.
Also, don't forget to replace that spring on the film advance post.
Hold the top deck down and turn the film advance post with your fingers in a counterclockwise direction. You should hear a ratcheting sound, and the film advance post should turn only in one direction. If you can hear it, then everything is in place. The frame counter can be tested by removing the back and moving the sprocket wheel in the direction that the film moves (left to right).
If you don't hear it, or if the film advance can turn in both directions, the arm is not in the correct position, and you'll have to repeat the replacement of the top deck and pull that arm out of the way a bit farther this time.
Once you're satisfied that the top deck is in place correctly and the frame counter is working correctly, replace and tighten the two screws that fix the top deck to the body. With all screws, tighten until snug. Then slightly tighten more. You don't have to make them insanely tight.
Replace both knobs. I find it easiest if you hold the knob while tightening these screws.
Check your rangefinder alignment again, and you're finished. With the Signet 35, it's very easy to block the rangefinder window, so make sure that your fingers aren't in the way.
The world through the viewfinder will be darkened, but you will be able to focus the camera - even indoors. You now have a functioning Signet 35 camera.