Agfa Optima Reflex: Big and Bold but Beautiful?
 In
the late 1950s and early 1960s, Agfa began to produce the Optima range --
a series of simpler 35mm cameras. Most were of modest specifications, offering
either an Agnar or Apotar lens and zone focusing and selenium meters. Some
of the more advanced models
had rangefinder focusing and the excellent Solinar lens. The Optima Parat and
Paramat served half-frame aficionados.
In
the late 1950s and early 1960s, Agfa began to produce the Optima range --
a series of simpler 35mm cameras. Most were of modest specifications, offering
either an Agnar or Apotar lens and zone focusing and selenium meters. Some
of the more advanced models
had rangefinder focusing and the excellent Solinar lens. The Optima Parat and
Paramat served half-frame aficionados.
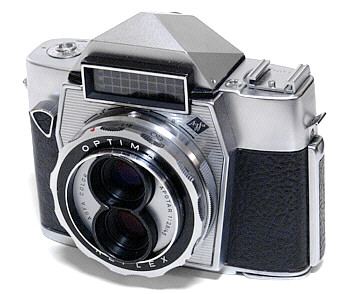
Now, one of the most unusual – at least in its physical appearance – was the Optima Reflex, a twin-lens reflex with pentaprism viewing and focusing and using standard 35mm film.
At first sight, it appears to be a huge camera, and in fact it is. It’s taller than most other 35mm cameras, including SLRs. The top of the camera has the large housing for the unsilvered pentaprism, an accessory shoe for a flash, the frame counter, a film-speed dial and small socket for a cable release. The pentaprism and structure adds noticeable weight to the camera.
I'm not sure you would want to call this camera attractive. But it has its own charm with its unique design that breaks out of the cookie-cutter mold. And you certainly won't mistake the Optima Reflex for any other camera out there.
The film advance is on the bottom, a bit like a Kodak Retina, but the lever is on the left -- film runs from right to left. On the other end of the bottom of the camera is a rewind crank and small button that releases the crank. Right next to that is the tripod socket.
The shutter release is on the front of the camera, sitting about an inch below the top plate.
It seems that all Optima Reflexes have a coated f/2.8 45mm Apotar lens. The viewing lens isn’t specified. Both lenses sit within a stout metal barrel. The front scalloped collar is for focusing. Small pictograms are on engraved on the top of the barrel, and distance marks are on the bottom. I wish it was the other way around, and there's no good reason for it not to be in a camera that offers through-the-lens focusing.
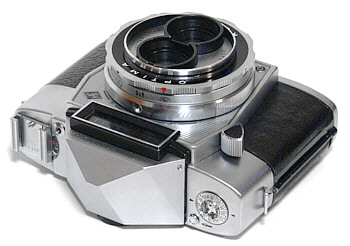
At the base of the lens is a second collar that allows the user to set the camera to autoexposure, flash and the appropriate aperture or manual aperture control for B shutter speed. The autoexposure is of the trap-needle preprogrammed type in which a range of apertures is matched to a range of shutter speeds, and settings are held by trapping the meter needle between two metal jaws. The selenium cell sits above the lens housing.
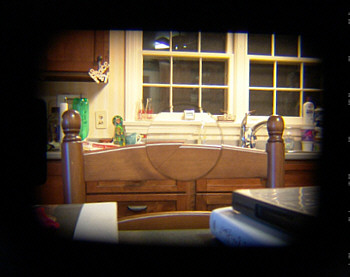
The viewfinder contains only a circular diagonally split image to aid focusing. There is no ground glass, so the photographer must focus carefully. Luckily, the viewfinder is very bright and can be focused in dim light when most SLRs begin to struggle. The viewfinder corrects for vertical parallax.
The viewfinder contains several indicators: A black “flag” slides out of the way when the film is advanced. And a “red” flag then moves to reveal a green dot if there is sufficient light to take a photo.
The shutter is an unspecified leaf shutter that sits between the lens elements. Most Web sites say that it’s a Prontor shutter, and I have nothing to support or contradict this. There are no slow speeds, and if it is indeed a Prontor, then speeds would likely run from 1/30 to 1/200-1/300.
The aperture gives a pentagram shaped opening, and manually selected aperture openings run from f/2.8 to f/22.
Out and about with the camera
The Optima Reflex is unlike other cameras you’ve used before.
Unlike most twin-lens reflex cameras, the Optima Reflex has SLR-style viewing, although most of its controls are more like those of its simpler Optima viewfinder and rangefinder siblings.
But remember that it's a TLR, so the viewfinder never blacks out. Perhaps it's the best of both worlds.
Once you get past some of the camera’s oddities, you can appreciate the "cool" factor of the camera and how Agfa managed to make a large package fun to use.
The viewfinder is big and bright, and the diagonally split central spot helps when focusing the lens.
Because there are just two collars around the lens, you don’t fumble trying to figure out which collar to grasp. The fact that the collar that controls exposure is at the base of the lens also helps avoid changing from autoexposure to B when you meant to refocus.
Like all front-mounted shutter releases, take care when taking photos so that you don’t move the camera.
The leaf shutter is quiet, as you might expect, and there is no mirror slap. There's simply a little click as the shutter opens and closes.
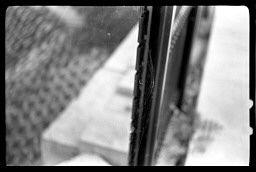
Much like its half-frame sibling, the Optima Parat, the Optima Reflex makes a distinctive mark on the negative. It's two small semi-circles, which you can see in this sample.
The frame counter counts down. So you set the total number of exposures when you load the film. When the counter reaches “0,” it’s time to rewind. The replacement of the rewind knob with a crank is a welcome improvement to camera design, and the Optima Reflex thankfully has a crank.
A close-up lens that I bought for the Optima Reflex weeks before I bought the camera is an interesting little accessory. It pushes on over the main viewing and taking lenses and allows the lens to focus as close as 1 1/4 feet. It’s a nice little accessory.
I was very pleased with the photos. The Apotar performed better than expected. The Optima Reflex's front-mounted shutter release still was a bit tricky. Most of these releases are sprung a bit too tightly, and you have to be careful not to move the camera downward when pushing on the release.
Check out the photo of the church in the show. You can see how well the Apotar has done. This is notable, because I probably was shooting at roughly f/4 as it was getting near sunset. Several other photos were taken with the close-up lens attached.
Restoration notes
This camera arrived with a bit of dust in the viewfinder, which was expected, and a shutter that only released intermittently, which had been disclosed.
It took several days to get all of the problems corrected -- all of which were caused by past users trying to force the camera to work. The most difficult problem was getting the jaws to release the meter needle in its “normal” position.
There are four screws that hold the pentaprism cover. Under that are four longer screws with mushroom cap heads that hold the pentaprism in place. The housing for the prism also has the small frame that holds the selenium cell in place.
If you remove the large lens that is the focusing screen, note that there are two leaf springs underneath. When you replace these, you don't tighten fully. You tighten until infinity is correct in the split image viewfinder. A loupe is essential because of the magnification reduction that occurs.
To remove the rest of the top deck, remove the screws on either end, the small post for releasing the film speed dial and then the small screw in the middle of the film speed dial.
The entire front housing, which includes the lens/shutter assembly and the shroud can be pulled in one piece. Remove the four screws from inside the camera -- there are two screws each in the film takeup and 35mm cassette chambers.
It is now simple to remove the Apotar’s rear lens element to clean the lens. To remove the front elements, you must first remove the small crescent pieces on the front. Use a small tool to get under a corner and try as much as possible not to bend or misshape it, because you eventually have to put them back. Remove the two screws and the cover for the lens lifts off.
The shutter is fairly simple to service without disassembling it.
Reassemble the parts in the reverse order, taking care to ensure that all pieces slide back into their correct positions. Moving the shutter release a bit can help.
When replacing the main part of the top deck, the thin part should slip in the front of the viewing screen. Move the frame counter post on the rear of the top deck to help it slide back into position. Don’t forget the strap brackets. Put them into position and then grasp both ends at once, using your thumb and middle finger as a large pair of forceps.
As always, take your time and don’t overtighten screws. They should be tight but not insanely tight.